One of the most effective ways to add depth and atmosphere to a scene is to use haze, fog or mist. We're not just talking about spooky graveyard fog, or waterfall mist (although those will be covered in this lesson). Extremely subtle haze in any scene can add depth and distance like no other technique. In this article we'll be looking at ways to do just that.

In this lesson we're looking at an effect that ranges from hanging sheets of vapour to billowing clouds. This is also an effect that, at times, may require absolutely no animation linework at all! For that reason, the article mostly looks at the design and treatment of the effect.
Thinly spread particles hang and drift in the air. Visibility through the effect depends on the density of particles which may be spread thin and even or wildly variable. In figure 1 we see a typical fog but take a look at the way it increasingly subdues objects with greater distances.

Fig. 1 - More distant objects are more subdued

Fig. 2 - Atmospheric haze showing distance
There are a few ways to approach this effect, depending on the situation and the look you're going for. As this effect ranges from subtle to heavy, we'll be looking at three common applications, mist, fog and haze, and how they're designed.
Fine, misty rain and waterfall mist is seen as falling sheets. Depending on wind turbulence, these sheets fall and flow in different ways. Often they're reminiscent of gossamer curtains rippling in the breeze.
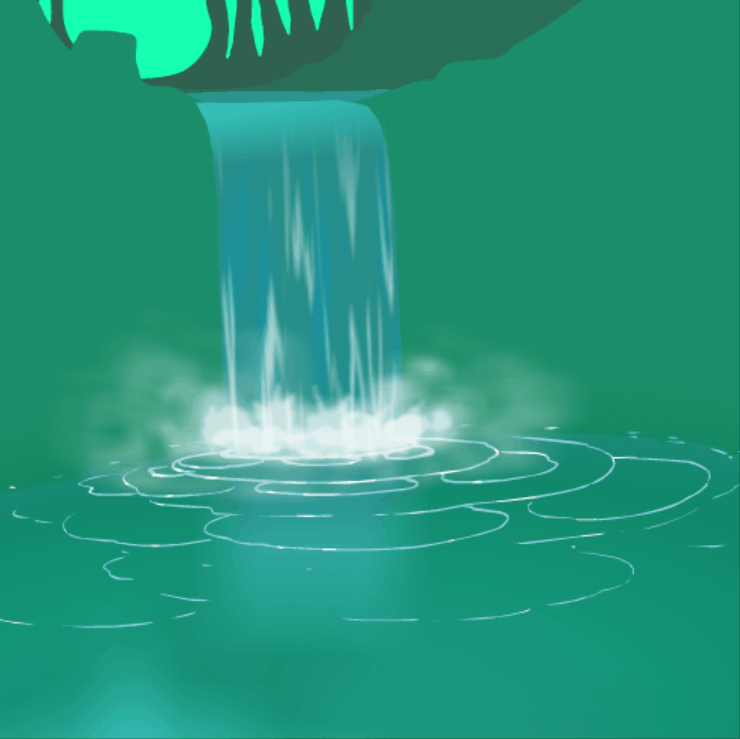
Mist at the base of a waterfall, or from the top of a breaking wave is very turbulent because of the massive forces at work which atomise water into heavy vapour clouds. This is a cross between a light mist and billowing fog but can appear so thick as to be foamy. In the example at right, the foamy base mist is on 4 layers with various treatments.

Thick fog could be designed just like a mist or smoke haze. This can be achieved with multi-layering of subtle clouds, but the colours of the scene can also sell the effect very well as seen above, in figure 1 & 2 and at left in figure 3.
When you see objects through thick fog, they can have a sharp outline, layered with a soft edge as the fog gently scatters light. An effective treatment to achieve this layering effect will be discussed in the treatment section.
Ground-hugging fog is observed as low, flowing sheets that drift extremely slowly. They can also take the form of clouds that rise and fall with gentle air currents. We'll look at those in a video below.

Fig. 4 - Dust haze. (not my image)
When it comes to design, there's very little separating haze from a thin, evenly distributed fog. Dust, smoke and other pollution are common hazes. Opacity, layers and design will depend on the density of the haze. For example a dust storm may create a very thick, billowing haze, while a thin smoky haze may be visible only by the graded colours of the scene. Figure 4 was taken by a newspaper photographer in 2009 when a heavy blanket of red dust fell on Sydney, Australia.
In figure 5, the haze really shows the greatness of distance. Even on a perfectly clear day, there is usually some desaturation of the most distant objects, thanks to the atmospheric haze. In our scenes, regardless of medium, we can use and exaggerate this effect to full advantage, colouring or treating the furthest background elements to give the impression of space and distance.
An example of atmospheric haze could take the form of a thin fog or humidity. Cloudy shapes are rarely seen in atmospheric humidity as the particles are evenly distributed over vast areas. The result is an overall haziness to a scene, rather than visible clouds.

Fig. 5 - Subtle amospheric haze helps show vast distance

A discussion of fog would be incomplete without the mention of light beams through a hazy scene. "God rays" bursting through clouds are the result of shadows cast through fog that is lit up by the sun.

For any of the fog effects we're discussing in this lesson, you can cut beams of shadow out of the fog to create that volumetric effect. This is the case not only with standard fog as we know it, but underwater as well. One of the most impressive things to accompany an underwater scene is shadow beams shifting and fading, as the light from above is distorted and scattered through the water. In the example below, I've made shadow beams not just from the surface above, but also cast by the fish.
Have you ever seen a rainbow around the moon, or sun? That's the effect of light scattering through haze and it's remarkably simple to achieve in 2D using radial gradients. Figure 6 contains a few different atmospheric effects, the most obvious are the hazy clouds, but also the blue flaring and extremely subtle "spectral halo" around the moon.
The video below demonstrates how this can be done, whatever software you use.
video fog_spectral
In the old days of traditional animation, subtle movements in mist or fog was usually achieved in any one (or a combination) of 3 ways:
Actually ripple glass is a really interesting one because it was useful for many other effects, especially water, but we'll talk about that another time.
There are many ways you can animate fog, from drifting to billowing. Drifting fog is easy, partly because most of the movement can be achieved by sliding the entire effect, for example, tweening a fog symbol across the scene in Flash, or in ToonBoom, animating it on a peg. In the video below, we're looking at a few simple methods of mist including a billowing cloudy design, which can be simplified with morphing, or shape tweens.
video fog_graveyardMist
One effective way to give depth to something that covers a broad area, like fog or mist, is to use layering. In this article we saw many forms of haze and fog but common in all of them is transparency. Behind fog we should see more fog, and further through that fog, we see even more. You can do this with colours and layered artwork. In the video below, we're looking at how the mist was layered in the earlier waterfall example.
video fog_waterfallMist
As mentioned in the design section above, the colours of the scene elements can be manipulated to achieve foggy depth. Likewise, a character emerging from the fog can be tinted or otherwise treated to give the impression of increasing visibility as he comes toward camera. Atmospheric haze is demonstrated in the video below.
video fog_haze
Without a doubt, the most useful effect module, or filter in fog treatment is the good old standard blur. The ability to control the quality of that blur is second to the ability to vary the blur values over a single layer. Toonboom has a variable blur module, which is controlled with a separate layer of black and white values. The video below demonstrates adding blur treatment to the graveyard fog scene, utilising both directional and variable blur, or as I refer to it in the video, v-blur.
video fog_graveyardMist2
Fog and haze can be used to add depth to a scene but may, in certain cases, require little or no animation linework. Similar to the layering methods of dust and smoke animation we've studied previously, churning mist animation like that at the base of a waterfall is a fun and useful skill to develop.
Up until now you've been given a number of challenges for each lesson. From here on though, I'd like you to challenge yourself to design, animate and treat each effect. Ideally you'd do more than just one token exercise per lesson.
All too often when we learn something, we progress to more and more advanced, difficult, and challenging effects. But just because you have passed the smoke ribbon lesson, does that mean you're a lifetime expert on smoke ribbons? Keep effects fresh in your mind by revisiting previous lessons as often as you can. Why not schedule a smoke effect each week, an electrical effect per day, a water effect per hour.. ok that's a bit crazy, but it's entirely up to you and how seriously you take your artistic growth in effects.

