In animation, I like to think of the reflection of light as the art of creating new worlds within surfaces. Whenever there's a reflection, you're constructing a new world; a new point of view with its own perspective, composition, colours and lighting.
In this article we're looking at situations where a polished surface reflects light from various angles into our eyes, or the camera lens.
Reflection is the bouncing of light, usually from surfaces. In this article we're studying a few simple surfaces such as flat, convex and concave. However there are some very difficult surfaces to consider in future, such as wavy surfaces and, in the case of liquid, animated wavy surfaces.
The first rule to understand is that light is reflected at the same angle that it hits a surface. This is easy to see for yourself if you have an ordinary mirror and sunlight. In Figure 1, the person's eye is looking at the mirror at the exact same angle that the sun is.

Fig. 1 - Light bounces from a surface at the same angle it hits. Don't ask me why the eyeball's on fire though.
Messing about with a mirror and a laser (see Fig. 2) is another excellent way to understand the bouncing of light from a flat, reflective surface.

Fig. 2 - Experiments with a laser and mirror
It's important to realise that the term "light" isn't just about lasers, torches, fires and sunlight. Everything we see is made up of light and it travels in straight lines. Therefore, in the same way that a laser bounces off a mirror and hits a wall, the image of a tree bounces off a pond and hits our eye.

Fig. 3 - All light bounces by the same rules
Reflections are inverted because of the way light is projected from a reflective surface. Have you ever really thought about why a tree reflection is upside-down? Or why images in an ordinary mirror are reversed? In Figure 3, light rays from the top of the tree are perceived closer on the surface than those of the tree trunk. From the viewer's standpoint, this makes the tree appear upside-down.
Exercise one
Take a few minutes to think about why mirror images are reversed. Why is text back-to-front in the mirror? Mentally trace construction lines from the actual text to the virtual text in Fig. 4, below.

Fig. 4 - Mirror image text
Exercise two
Add a simple reflection to the scene in Figure 5, below. If you enjoyed lesson 0304, add a shadow for the boat.

Fig. 5 - Add a reflection to this scene and optionally, a shadow.


At some point, we've all seen a shadow or reflection that is an obvious duplicate and flip of the original. This works just fine for elements with a low horizon as seen in Fig 6. When the viewer is close to the reflective surface, the reflected tree appears almost an exact duplicate of the actual tree.
However with a high horizon, i.e. from a higher angle looking down on the tree, what happens? You can see in Fig. 7, the reflection doesn't work as a simple duplicate and flip. It actually looks pretty stupid.
A reflection puts your eyes on the surface. Imagine you can pluck out an eye and throw it in the water. That eye on the surface looks up at the tree. How that eye sees the tree is what the reflection should look like!
video reflxn_surfaceEyeball
In the videos below, I'll be doing some freehand construction for various reflections. Constructing reflections is somewhat similar to setting up the perspective or lighting in a scene. Angles and composition are carefully considered, while points and rays need to be plotted.
It can, however, can be an extraordinarily complex process at times. While we are 2D artists who take pride in giving depth to our hand-drawn worlds, it's often more practical to construct your reflections, perspective and lighting with aesthetics and composition in mind first. Rather than labouring for hours setting up a simple shot, it's all about drawing on aspects of your construction knowledge to add that extra touch of realism.
Let's be clear though, this is not to explain away an ugly scene, or excuse laziness. Understanding HOW reflections work will give you the ability to make your scene amazing, even without tedious overly-technical construction.

video reflxn_nutshell1
video reflxn_room1
video reflxn_slopeUp
.

To some people it's a no-brainer, but to others, the construction of reflections and shadows can be confused with one another. The differences are:
Consider a duck floating on a reflective but opaque surface, for example a muddy pond. This scene will have shadows and reflections, as seen in Figure 9.
.

At first glance, it may seem that reflections on a convex surface are easy. Seemingly, you can compress a large scene into a small area for the impression of a wide-angle reflection. This may work to an extent, but only for distant objects. The real characteristic is the circular distortion.
When viewed through a wide-angle door-viewer for example, a person's face is ballooned, the closer they are to the lens. This is the same with any convex surface reflections.
In 2D animation, this once meant hand-drawn distortion of the animation. Nowadays however, the effect can be achieved with digital distortion and warp effects.
You may remember in Level 2, the Surface Tension lesson how I said that highlights on a water bead should be tiny sparks, rather than big blobs of white. Convex surfaces like water beads are a prime example of reflective surfaces that compress details into tiny areas. Take a look at the sunlight reflection in Figure 10. It's extremely small, but what would a water droplet be without it?
Imagine a mirror ball with all its small mirrors in that spherical array, reflecting outward. A scene reflected in a mirror ball is made up of squares, as if heavily pixelated. However, each mirror reflects in the same ways we've seen in this article so far, with the eyeball on the surface concept, the perpendicular construction rules and so on.
Now imagine the same mirror ball with twice as many, smaller mirrors. The scene is smoother and less pixelated, but again, the rules of reflection are the same.
Once more, halve the size of the mirrors and double their number. Keep doing that until finally you have a ball that's so completely covered in microscopic mirrors that it appears chrome-plated. The scene is no longer pixelated. The distortion is smooth but the rules haven't changed.

Alright so that was just a thought experiment in how curved reflections work. We'll be revisiting that one when we talk about wavy water surface reflections in the future.
Concave reflections are quite uncommon. You can get a concave mirror as part of a shaving kit, but if you've ever tried to look into one, it's not a comfortable viewing experience. The reason is that it splits your vision, as if trying to make your eyes look in separate directions.
A concave mirror is generally used for magnification, or focusing light. In some 1980's video arcade games, players looked into a concave mirror that magnified and inverted the image from a smaller monitor within the cabinet. A local arcade owner told me that when moving arcade cabinets, it was illegal to carry them, uncovered, on the back of a truck because the concave mirror could focus sunlight and start fires on the roadside. Not sure how much truth there was to that, but it does make sense. I have a small concave mirror and in full sunlight, the focused beam is quite dangerous.
In animation, concave reflections are difficult to construct accurately. The first that comes to mind is the reflection inside a spoon, or polished dish. In a later article we'll look at refraction where the same effect can be seen through things like a glass of water, or a crystal ball.
 Design and Treatment
When we think of reflections, we generally think of crisp mirror images, but one big consideration is the clarity of the reflection. Sometimes, a surface is only glossy enough to reflect vague, almost blurred images.
A good example might be a polished wooden floor. The reflection is definitely there, but nowhere near the clarity of a proper mirror image. In Figure 12, you can see a definite reflection in the wet woodstain. Even though it's fuzzy and unclear, you can make out the position of my head in the reflection, the fact that it's an upshot and even the colour of the sky!
It's good to consider how reflective your surfaces and materials are, before you start.
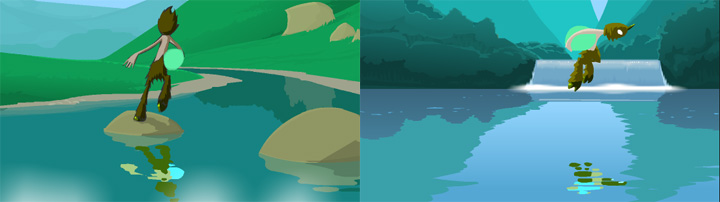
When it comes to colourstyling and treatment, reflections can range from an exact virtual replica, or a heavily stylised version. Take a look at Bitey's reflection in Figure 13. Far from a clear duplicate of the character, it's a reflection stylised specifically to give a sense of speed.

Combined with other effects, understanding reflection and how to implement it in your work is key to standing out. I've mentioned several times throughout this course the importance of doing stuff that nobody else is doing to put you ahead. Really understanding light, shadow and reflection can give your work that razor sharp edge that makes people say "whoa.." and "..how?"
I feel it necessary to mention my sources here. Hardly anything I know about perspective, light, colour or reflection was ever handed to me in my early FX training at Disney. Whether as an artist, animator or FX animator, I was mostly expected to improve my skills on my own time. Over the years, therefore, I've done a lot of my own research into these, and other areas.
My decision to leave Disney was partly due to the frustration of being unable to break out of my specialised role. I am passionate about FX but was fascinated by certain other departments, including the technical aspects and beautiful work of the layout department, and the jaw-dropping artistic genius of the background painters.
Many artists are happy to sit forever in their cubicle doing their job and only their job. I however, wanted a taste of storyboards, layouts, backgrounds, compositing, colour-styling, CG and more. So I had many extra-curricular interests and researched many things at home and outside of work hours, all of which made me the artist I am today. Since technical drawing class in high school, I've had a lasting interest in perspective and architectural precision (probably the reason layouts appealed so much to me).
It's a never-ending learney journey!

