 In this
lesson, you'll use a little of what you learned from each of the smoke,
dust, torch and steam articles to create a cloudy column of smoke. The
principles are linked, so if you're familiar with those articles, this one
will make much more sense, if slightly more difficult to master.
In this
lesson, you'll use a little of what you learned from each of the smoke,
dust, torch and steam articles to create a cloudy column of smoke. The
principles are linked, so if you're familiar with those articles, this one
will make much more sense, if slightly more difficult to master.
![]() As the basics have been previously covered in great depth,
this article will focus on the practical aspects, consisting of more video
demonstrations and images, than textual descriptions and sheer word count.
As the basics have been previously covered in great depth,
this article will focus on the practical aspects, consisting of more video
demonstrations and images, than textual descriptions and sheer word count.
Clouds of hot, incompletely burnt particles rise and disperse into the atmosphere, spreading further and further apart until the column is no longer visible.
Initially the particles are hot. Clustered together they maintain heat for longer, so they rise quicker and have more direction as a dense, cloudy column. However as they cool, they wander. The clouds disperse, becoming thinner and more aimless, their upward momentum losing strength and direction.
Finally, smoke particles are dispersed and thinly spread, drifting as haze which settles or disperses further over long periods of time.

In this lesson we're designing smoke for the torch fire we saw in lesson 0301. For the sake of simplicity, this smoke will be designed with an uncomplicated path through the air, free of any turbulence. This will help get a feel for the physics of the effect without external complication. The turbulence of heat itself will be enough to give us the rolling cloudy shapes we need.
First, we establish the path and spread of the smoke by drawing an outline to which the effect should be confined. A smoke pillar may then be constructed in simple linework. Two or more designs should be done for any given scene as a kind of warm-up for the smoke effect. This process is covered in the video below.
When smoke dissipates, it merely fades from view because it has spread too thin to be cloudy and obvious. The particles are still there, though thinly spread as a subtle haze. This haze may hang and drift for long periods of time before settling.
In animation, smoke is often simplified as a disintegrating clouds effect. If this dissipation happens too quickly like steam, it can appear unnatural, or simply cheap.
In the video below, we're looking at making smoke dissipate without sacrificing too much realism. When you're asked to force effects into unrealistic behaviours, the best you can do is make it appear as natural as possible.
When you think "cloudy smoke" in 2D animation, you probably think of the traditional style. Cloudy smoke is classically treated as a single layer with two colours for light and dark (see video below). This style is an illustrative way of adding depth and volume to the smoke column. The main thing is that it's not always necessary to use this style. Realistically, smoke needs to be very dense to have that appearance of opaque, billowing clouds. Generally though, simple smoke like torch, camp fire and the chimney smoke in the video (below) doesn't have the density for stark light and shadow.
There's nothing stopping you from using the classic two-tone heavy light/shadow method for small-scale cloudy smoke, though it really is quite difficult to animate and, even for the experienced, very time-consuming. In realism, only thick smoke should have heavy volume lighting, so unless you're going for a retro style of two-tone cloudy smoke, I believe this method is slightly outdated because digital treatments like filters and layering allow us to make more realistic smoke quicker and easier.

Once again, as with smoke, steam and any other cloud effect, beware the popcorn effect. When designing, give your smoke realism with a constant but randomised outline.
In Fig. 3 (left) you can see the difference between the two. Despite how silly it seems to us, the popcorn effect is common amongst people who don't know what they're doing.

Fig. 4 (right) - the design of a smoke cycle
Creating a cloudy smoke cycle can be very difficult, especially if you're working in the two-tone colour style. Not only must every single shape and arc animate evenly into one another, but the smoke tone must also animate with the same consistency.
I recall working with animators who fail to consider these points and blame inbetweeners for the resulting mess. An inbetweener isn't to blame and won't make your animation look any better if you create careless key drawings.
In Figure 4 (left), you'll notice that there are "puffs" of smoke at regular intervals (each marked by the key '1'). This is a smoke column designed especially for cycling. The idea with this design is that if you inbetween this drawing onto itself, it will cycle infinitely. You may remember we touched on this type of cycle in the ripples and flag articles.
.
Exercise one
Using linework only (see Fig. 4), design a smoke column that cycles infinitely. Try to avoid something that looks too mechanical or "puffy" and ensure that every single shape, cloud, puff, lump or arc is accurately repeated, from the source all the way to the top of the column.
Timing
The speed of this effect depends on the scale and the fuel, but it also depends on what mood you're going for in the scene. An inviting chimney smoke column from a forest cabin? Or a terrifying, turbulent, post-explosion column from the fiery death of a race car driver?
In our simple torch scene, we're going for a realistic timing first. In the video below, we're looking at spacing for pose-to-pose key drawings on 8s at 30fps.
When doing pose to pose animation, you should be aware of the timing of inbetweens. It's best to work on 4s or 8s because it makes the process easy of inbetweening simple halfway drawings. It's all well and good to have your keys timed 6 frames apart, but bear in mind that 6 frame timing requires a slightly more advanced style of inbetween; namely that of inbetweeing on thirds. If you are comfortable inbetweening on thirds, fine. If not, then be aware of the fact that your smoke timing can be ruined by an inexperienced inbetweener struggling with the concept of thirds. This is demonstrated in the video below.
 Regions of speed
 As I briefly touched on in the first timing video, the source of the smoke moves fastest, so for a nice touch, your shapes should move faster at the bottom, then slow down slightly at the top. This is also why, in the design of your smoke, the base/source generally should have thinner, more elongated, directional shapes. The upper part of the smoke gathers in slower moving clouds.
If you're prepared to do something extra special and non-standard, why not consider some wrapping and twisting smoke. Shapes that initially move in front can spiral behind the main column, then reappear to wrap around the front again. This is advanced stuff but you can really add that extra something that is really only seen in the best, most expensive 2D feature film FX animation.
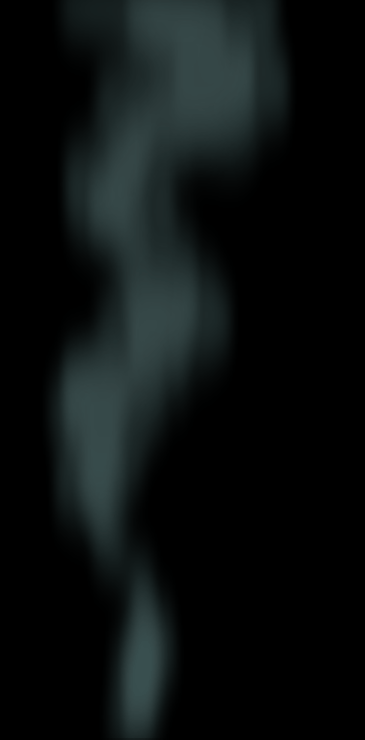
Unlike the thin, ghostly incense smoke which has a hollow appearance with transparency in the centre, cloudy smoke is the opposite. As you saw in the earlier reference video, it has opacity and thickness in the centre, with some fuzziness around the edges. To achieve this, you may like to add a separate "density" layer. Depending on your familiarity with digital tools, this process can be very fast; a simple matter of painting large blobs where you want your clouds to be thickest.
As mentioned in the video above, the image at right is the finished smoke effect with the density layer.
If you're aiming for realism, you won't have visible linework and your smoke will consist of just one or two colours. For really dense smoke, just like dust, you may like to use lighting effects such as the two-tone style.
The two tone style of smoke should need very little digital treatment because the lighting is drawn directly onto the smoke. For shadow, this is generally a darker version of the main smoke colour. If the two-tone is a light effect (rather than shadow), for example fiery orange underlighting, then it can be a colour chosen without regard for the base smoke colour.
By way of digital treatments, a soft, fuzzy edge may be given to the smoke using blur, but beware: blurring the entire effect will result in a softening of the two-tone effect, which isn't always desirable. If any blur is to be added, a directional blur is more appropriate, as it offers a slight variation in the blur, allowing sharper vertical edges and softer horizontals. Directional blur also helps smooth out the movement of the smoke, giving it a kind of motion blur effect.
As mentioned in the dust and steam articles, you should be very careful with transparency, especially if you're using a two-tone effect. Remember that two-tone means density, but transparency means the complete opposite. Adding transparency will ruin any density that you've worked hard to portray with the two-tone or other lighting effects.
Cloudy smoke is by no means a quick or easy effect to tackle. Sure you can just do a smoke scene and hope it turns out alright. However, without training or time to practice this difficult effect, what can you do but your best, and hope it's good enough? Animators are forced to do that every day, so in cheap Saturday morning cartoons, we see rushed, naive attempts at smoke.
This article has shown you how to design and animate a feature quality smoke column in calm conditions. In your work you will some day need to animate smoke under the influence of turbulence and other forces, but knowing how smoke behaves in still air gives you a head start.
Keep in mind that these days, realism can be easier, quicker and less expensive than some traditional styles and workflows. If you're asked to create a two-tone smoke or dust effect, see if you can educate your director or supervisor on the differences between what's possible today, versus what was, 50 years ago, the only way.
Beginner - As demonstrated in video 1, design 6-8 keys of cloudy smoke rising from an object, such as a chimney.
Intermediate - Design and animate a 24-frame cycle of cloudy smoke emitting horizontally from a vehicle exhaust pipe. Make the smoke high energy and blasting from the source, before gathering into cloudy smoke.
Advanced - Design and animate cloudy smoke emitted from a spiralling object falling through the atmosphere, such as a meteor or destroyed aircraft.
If you happen to use Adobe Flash/Animate, my smoke density later file is available in the files directory:

