 Ribbon Smoke
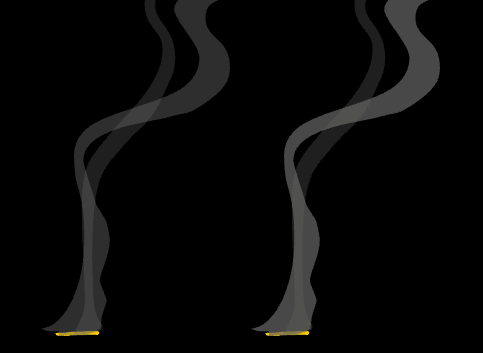
Smoke clouds can be simple, or nightmarishly complicated. Of course, we'll be starting at the shallow end with smoke "ribbons", commonly seen from incense, cigarettes or candles.
I like to think of smoke as dead flames. Touching briefly on smoke in the previous lesson, I mentioned that burning matter of glowing particles rise and expire. These now dead, cooling particles are known commonly as "soot", rising on heat currents and eventually dispersing in the atmosphere.
In everyday fires, smoke is generally a sign of inefficient, or incomplete burning. Starving a fire of oxygen reduces its heat, and therefore its ability to thoroughly burn fuel, which means more smoke. However, the more oxygen, the hotter the fire and consequently less smoke.
While efficient fires are hotter and less smoky. Less efficient fires have more yellow, orange and red flames. It's these that are usually accompanied by more smoke.
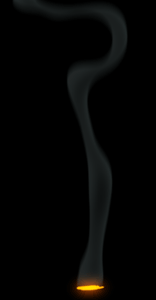
Just as with a steady candle flame, flowing smoke "ribbons" are the result of a steady and consistent fuel supply. The difference here is that it comes from fuel that smoulders, instead of catching fire. This is the case with cigarettes, joss sticks, incense and so on.
Without flames, there's less heat to throw the smoke upward into cloudy shapes. You may have seen the crude inter-twined line style of ribbon smoke in old cartoons (or even new ones!). Depending on how this is animated and treated, it can be quite effective. Generally though, it's more suited to an illustrative style, than realism.
Let's start by sketching out a few poses of incense smoke in that ribbony design.
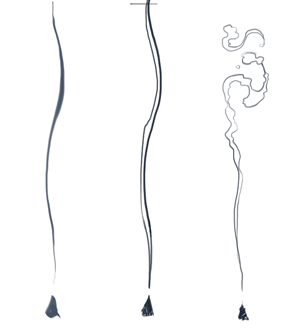
You might find a variable thickness brush works well for your early rough sketches, increasing the pressure for thicker ribbons. Once you get a feel for the design though, you'll get better control by drawing the outer lines of each ribbon.
As the particles are released from the source, they are hot and rise quickly at first. But as they cool, they slow down, catching up with one another, gathering into cloudy shapes as they dissipate.
At this early stage I'd advise against designing anything you're not comfortable animating. However, if you're confident, up for a challenge, or have some animation experience, you could incorporate some cloudy design into the ribbon effect (as seen at right). Down near the source, keep the design ribbony and flowing. The cloudy stuff should mostly happen up higher.
In some ways, ribbons are less complex and quicker to animate than the cloudy styles. When it comes to subtle movement though, you'll need a steady hand to avoid line jitter (more on that in a future article).
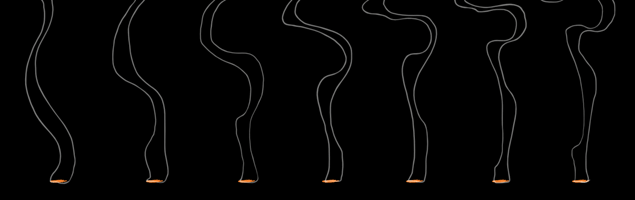
Ribbon smoke is a gentle flowing effect so you'll use the "pose-to-pose" method. If you're new to animation, this means, you'll animate the ribbons with key poses first, work on the timing to get it right, then go back and "inbetween" the movement, to smooth it out.
Below is a sequence of key poses ready for timing, then inbetweening.
Tip - If you use 2D animation programs, you can take full advantage of morphing or shape-tweening tools, instead of inbetweening the poses by hand.
Remember as you animate, keep things moving upwards! Don't let any shapes move down the column, otherwise you'll ruin the effect.
We're going for a gentle, fluid motion, so keep the timing steady paced. Parts of the ribbons can occasionally accelerate and swirl, but as a rule keep it all gently flowing.
In traditional 2D animation, true realistic treatment of ribbon smoke is incredibly difficult. It's a semi-transparent cylinder of particles so clever layering is often necessary for all but the simplest design.
For single-layer effect however, I've developed a fairly effective technique to simulate something like a see-through particle tube.
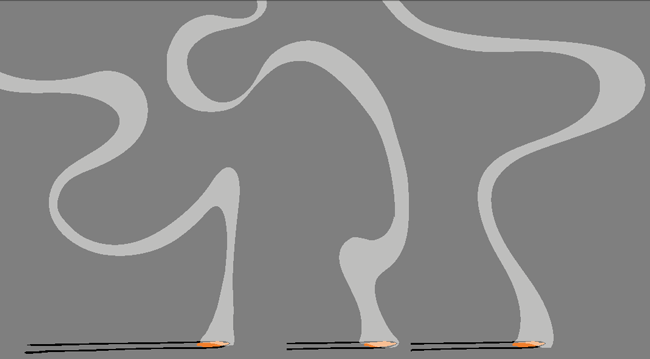
Basically, a smoke ribbon appears more substantial at the edges, while transparent through the middle, almost like a translucent silk stocking (see animation at left). You can achieve this by first making the smoke invisible, then giving it an inner glow, coloured smoky grey, or whatever coloured smoke you like. This makes the smoke appear solid on the sides, but hollow through the core. See left: The smoke animation before and after treatment.
In addition to the inner glow, it's generally best to have some softening of the entire effect. I find the most suitable is a North directional blur, which gives just enough variable softness to the edges, without going over the top. With this treatment you still get that occasional sharp edge in parts, but elsewhere, maintain the fuzziness of smoke.
As if it wasn't realistic enough, I like to add a very subtle light blue "offset" rim (highlight) which gives the whole effect some depth. These are software tricks that will differ depending on the programs you use.
If you use Toon Boom software, you can make a transparent tube effect using a cutter and blur node. In this level's videos folder check out the video named: 0103_ribbonSmoke_cutter.mp4
Frame rate: 24fps
Duration (seconds): 3s (72 fr)
Dimensions (pixels): 432 x 243 (16:9)
Tasks: Do not worry about final colour or; treatment. Choose from the following and make the timing as realistic as possible
Beginner - Animate 6 keyframes of simple ribbon smoke on 'singles' (ones), rising upward.
When you're happy with the design keys, increase their exposure until the movement seems natural and realistic.
Only when you're completely happy with the timing, fill in the movement with inbetweens.
Always remember, you must never move on to the next phase until you're 100% happy with the previous phase.
Intermediate - Animate 6-8 keyframes of a dual ribbon smoke, each ribbon with a slightly different speed.
When you're happy with the design keys, increase their exposure until the movement seems natural and realistic.
Only when you're completely happy with the timing, Fill in the movement with inbetweens but ONLY when you think it looks AMAZING.
Always remember, you must never move on to the next phase until you're 100% happy with the previous phase.
Advanced - A hot pie on a window sill. In the style of dual ribbon smoke, design and animate a looping cycle of steam 2-3 seconds (48-72 frames)
Incorporate some turbulence or directional wind for interesting behaviour.
Now you're armed with the knowledge of animating smoke ribbons, go ahead and experiment! With a bit of practise, the possibilities of this beautiful effect really are exciting. Well-considered designs and subtle animation combined with a realistic treatment and interesting colours will put your scene well beyond reach of any competition.